Microsoft Defender
Configuring Microsoft Defender base integration
Note: Prelude integrates with multiple Microsoft use-cases/products. You can configure a single Microsoft App registration for all Microsoft integrations here, or continue below for use-case specific integration instructions.
To attach a Microsoft Entra ID account to Detect, you will need:
- The Prelude Dashboard / UI (US1 | EU1) or Prelude CLI
- An Azure user with Global Administrator role
In Azure
Create an App Registration
- Navigate to the App registrations section in the Azure Portal.
- Select "+ New registration" toward the top of the page.
- Enter a name for your application
- Choose Single tenant as the supported account type (Accounts in this organizational directory only). Click Register.
- Leave Redirect URI (optional) as it is.
- After registration:
- Copy/Save the Application (client) ID and Directory (tenant) ID from the app's Overview page.
- In the left menu, expand the Manage section and select Certificates & secrets and create a new Client Secret:
- Click New client secret, enter a description, and set an expiration period.
- Copy/Save the generated Client Secret Value (you won’t be able to view it later).
The following information are need to be documented/saved for later.
- APP ID (Application (client) ID) from step 6
- TENANT ID (Directory (tenant) ID) from step 6
- APP SECRET (Client Secret Value) from step 7
Granting API Permissions
- In the left menu of the app you created, select API permissions and click Add a permission
- Under "Microsoft APIs" select Microsoft Graph
- Select Delegated permissions (not Application) and add the following API Permissions.
User.Read(note: this may already be selected)
- Select Application permissions (not Delegated) and add the following API Permissions.
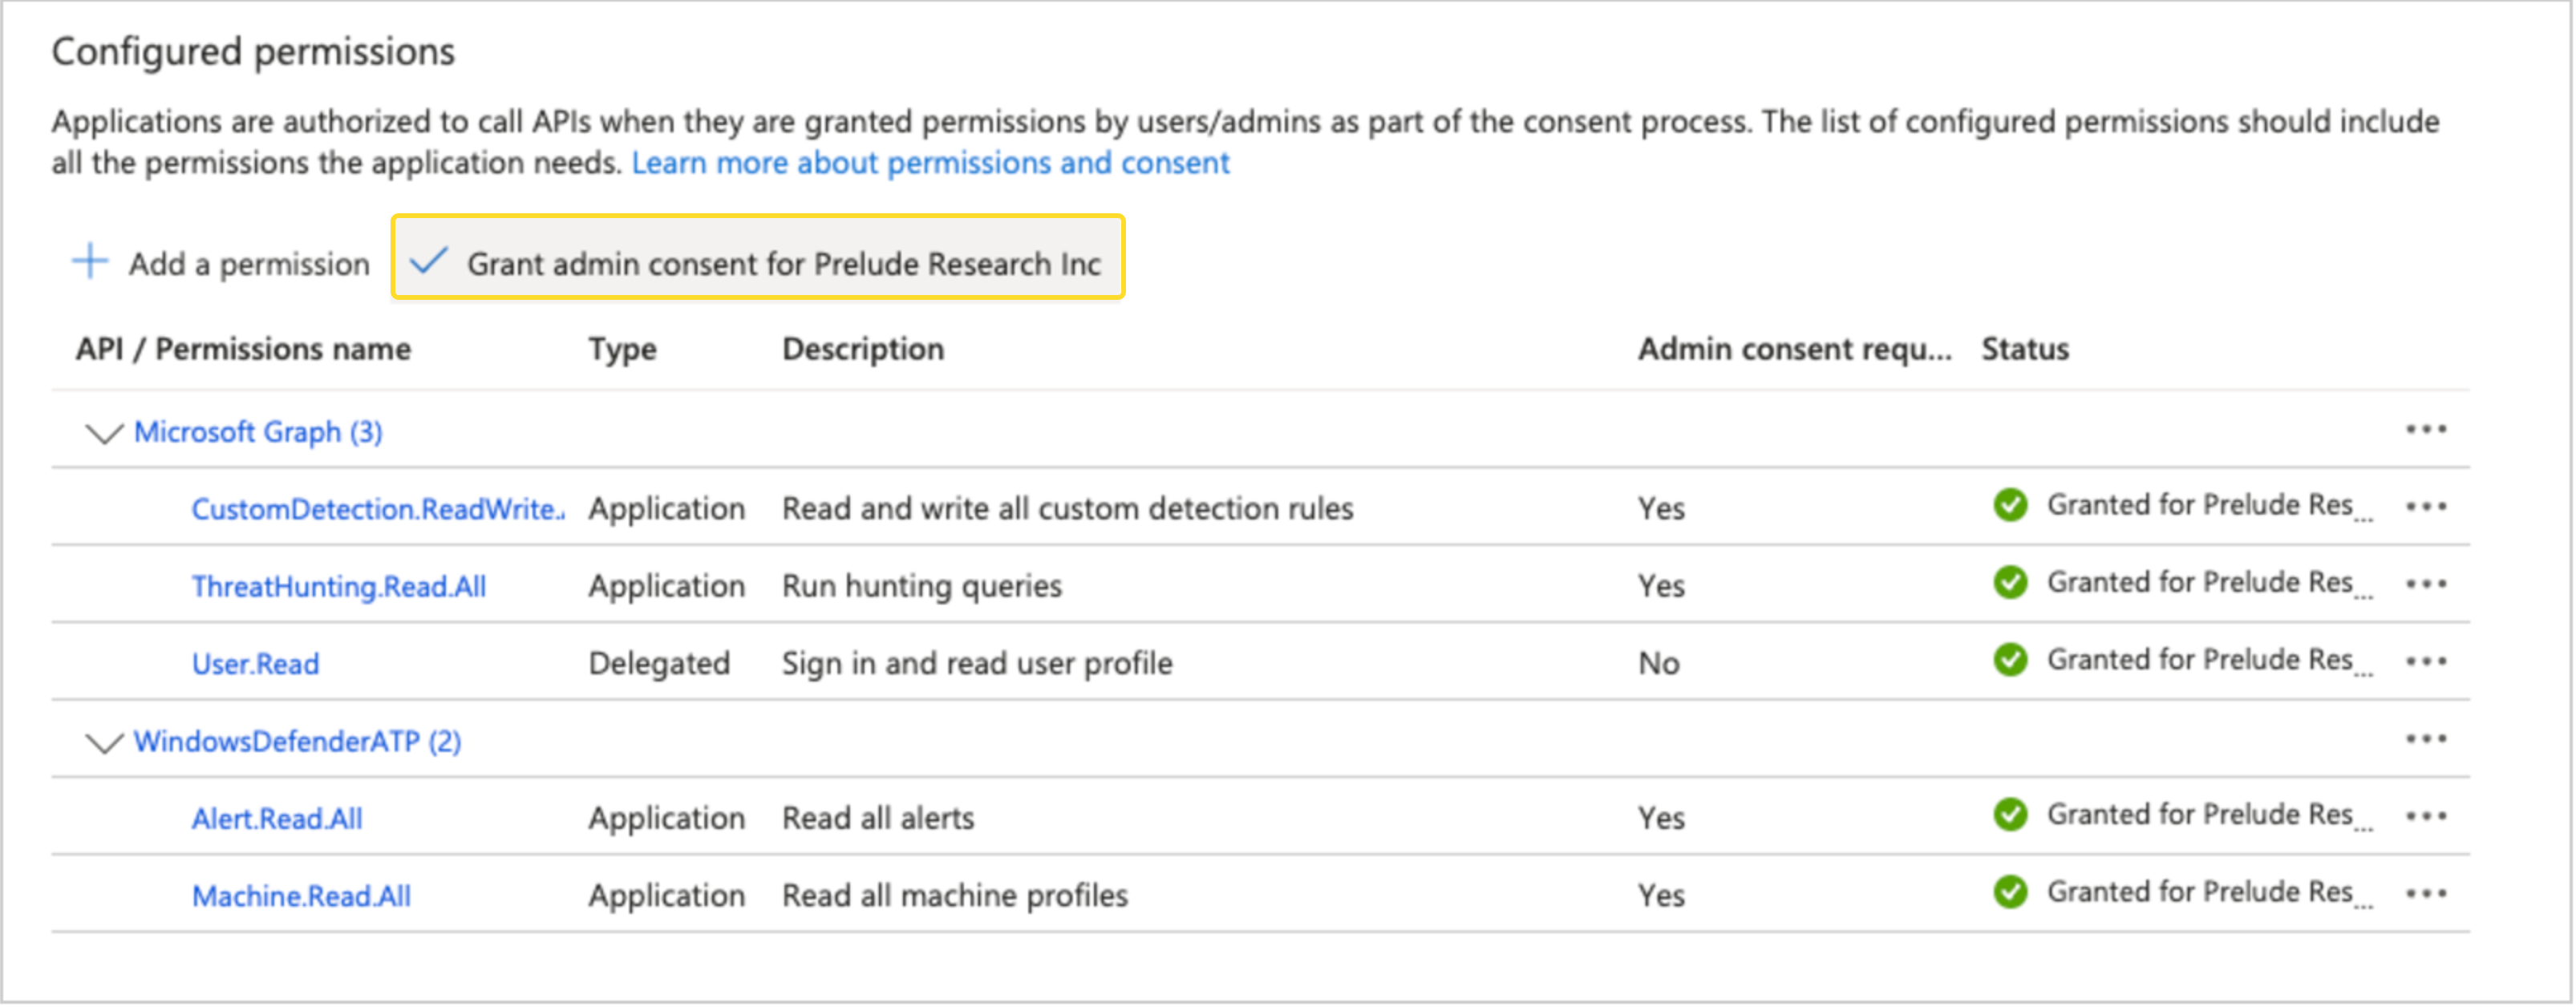
ThreatHunting.Read.AllCustomDetection.ReadWrite.AllDeviceManagementConfiguration.Read.All
- Select Delegated permissions (not Application) and add the following API Permissions.
- Under "APIs my organization uses" search for: "WindowsDefenderATP" select "WindowsDefenderATP"
- Select Application permissions (not Delegated) and add the following API Permissions.
Alert.Read.AllMachine.Read.AllTi.ReadWrite.All
- Select Application permissions (not Delegated) and add the following API Permissions.
Note: After adding the above permissions ensure you select "Grant admin consent for " as show in the screenshot below:

In Prelude
Attach the partner
You can attach a partner via UI or CLI
via UI
- Navigate to your user name in upper right hand corner and select "Integrations"
- Select the "Connect" action for Microsoft Defender
- Fill out Base URL, Tenant ID, APP ID and App Secret to connect
- Base URL should be set to
https://api.securitycenter.microsoft.com. Optionally can be set to hit one of Microsoft's regional endpoints, examplehttps://api-<REGION>.securitycenter.microsoft.com
- Base URL should be set to
via CLI
Ensure you have the latest version of the CLI
- run:
prelude partner attach --api https://api.securitycenter.microsoft.com/ --user {TENANT ID} --secret {APP ID}/{APP SECRET} DEFENDER- replace {TENANT ID}, {APP ID} and {APP SECRET} with the values from your App Registration
--apiis a required field that should be set tohttps://api.securitycenter.microsoft.com. Optionally can be set to hit one of Microsoft's regional endpoints, examplehttps://api-<REGION>.securitycenter.microsoft.com
Detach the partner
via UI
- Navigate to your user name in upper right hand corner and select "Integrations"
- Select the "Disconnect" action for Microsoft Defender
via CLI
Ensure you have the latest version of the CLI
- run:
prelude partner detach DEFENDER
Updated about 1 month ago
